
Your UR robot and your conveyor line, working as one cell.
Conveyor-aware pick and place, palletizing, case loading and gripper control for UR robots, on PolyScope 5 and PolyScope X.
- PolyScope 5
- PolyScope X
- works with the Solid Automation 7HMI line panel
- licensed per robot
One install. Four jobs.
The Solid Automation URCap suite is one install on a Universal Robots arm. It adds setup screens and program nodes for four jobs:
- Robot Link: the robot sees the conveyor line live and stops the bed it is working on.
- Palletizer: builds pallets on two stations from a conveyor.
- Case Loader: packs products from the line into cases.
- Gripper: one setting for the gripper on the wrist, used by every node that picks.
Vision is coming soon.
The four parts share one link to the line, one gripper setting and one licence. Programs are built in PolyScope's normal program tree, from Solid Automation nodes, and the URCap runs on both PolyScope 5 (e-Series) and PolyScope X.
Works with the Solid Automation 7HMI line panel. Robot Link, the Palletizer and the Case Loader talk to the 7HMI conveyor panel on the line over Ethernet. The Gripper part works on its own.
The robot and the line talk to each other.
The robot and the conveyor line talk to each other, so the robot never has to chase a moving part.
Only the robot's bed stops; the rest of the line keeps moving, and the handshake happens before the robot reaches in. Illustration, not to scale. Open full screen
What it does
- Connects the UR robot over Ethernet (TCP) to the line's 7HMI conveyor panel.
- The robot sees the whole line live: running, stopped, faulted, and the fault text.
- Before each pick it asks the panel to stop the bed it works on, waits for zero-speed confirmation, picks, then hands the bed back.
- The robot can also start, stop and reset the whole line.
Key features
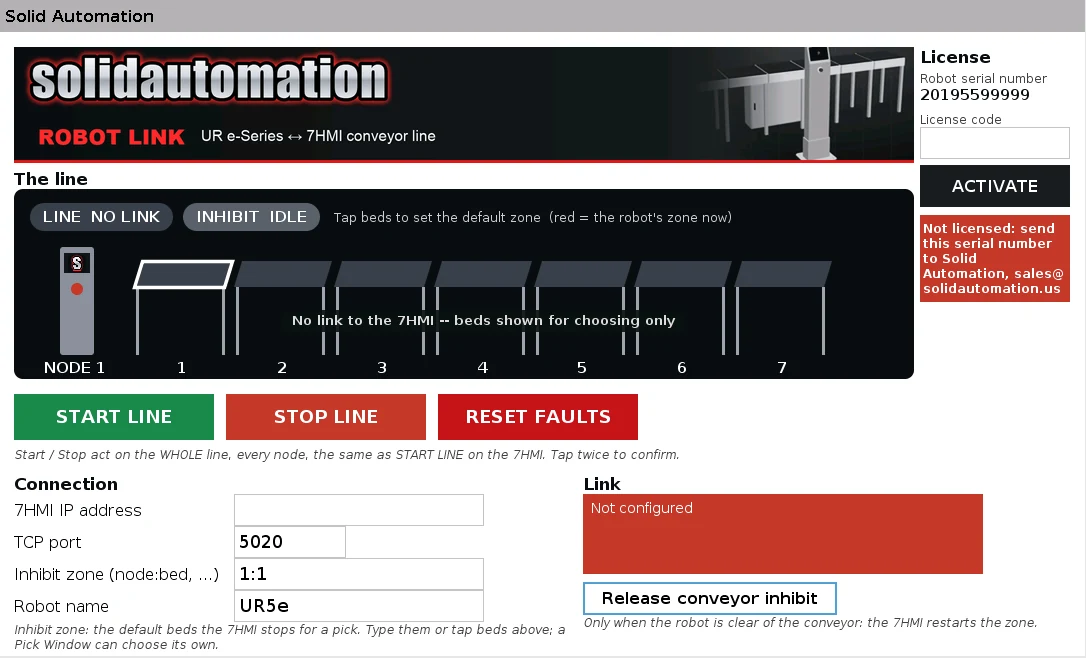
- Live line diagram on the setup screen: beds show green when running, grey when stopped and red when faulted, with the robot's own beds marked. Tap a bed to make it the robot's default zone.
- START LINE / STOP LINE / RESET FAULTS, each with a second tap to confirm. STOP is the line's controlled stop: moving cartons finish at their next photo-eye. A start is refused while an E-stop is active.
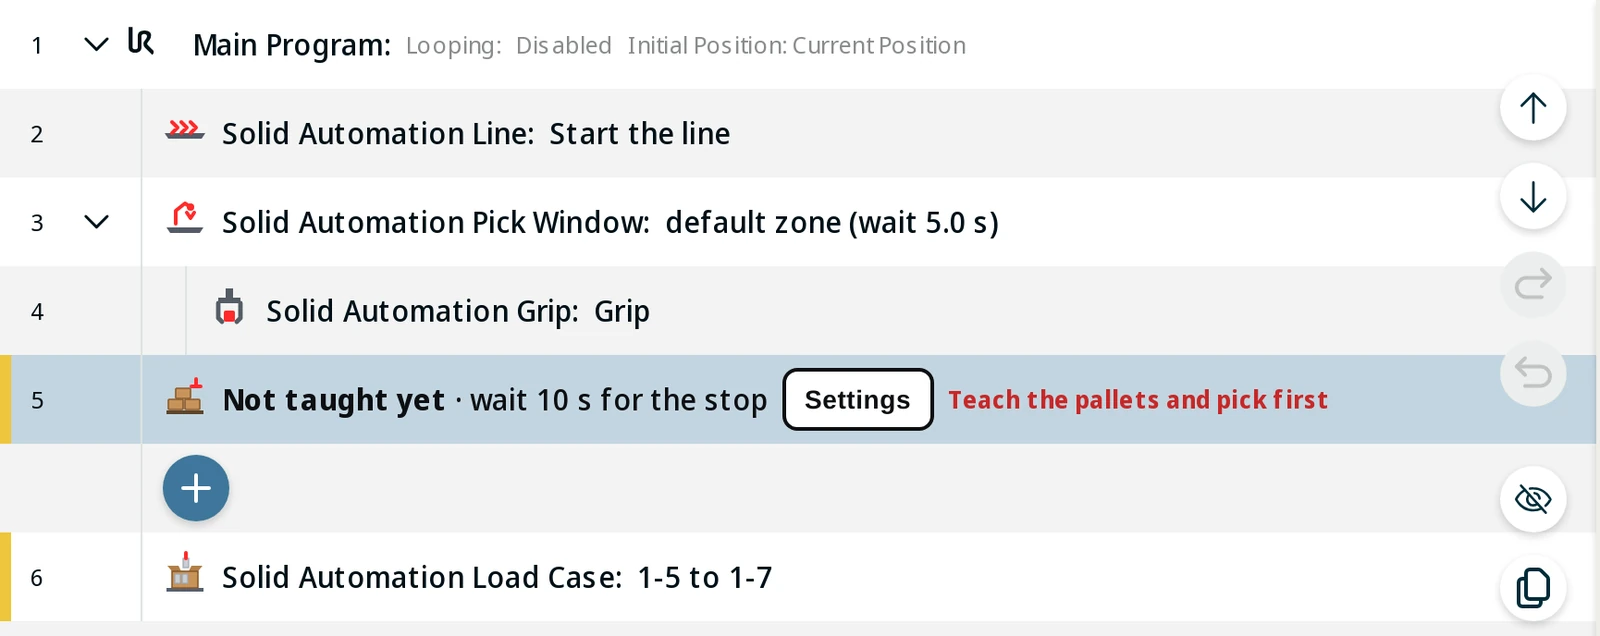
- Pick Window node: put your approach, pick and place moves inside it. It stops the chosen bed, waits up to a set time for the stop, keeps watching that the bed stays stopped (and can halt the robot if the hold drops), and releases the bed when its moves finish. Each Pick Window can choose its own bed.
- Line node: start, stop or reset the whole line from a program, and optionally wait until the line reports RUNNING or STOPPED.
- If something goes wrong: when the conveyor doesn't stop in time, or the panel refuses, the program stops with an error or skips that pick and continues. You choose which.
- Script functions for If, Wait and Assignment nodes: line running, line faulted, line state, conveyor running/faulted, fault text, request/release the stop, choose the bed, line start/stop/reset.
- Fail-safe link: a heartbeat runs every 200 ms; after 1 s with no messages the link counts as lost. If the link drops while a bed is held, the panel keeps that bed stopped and latches a fault until an operator resets it.
Screens
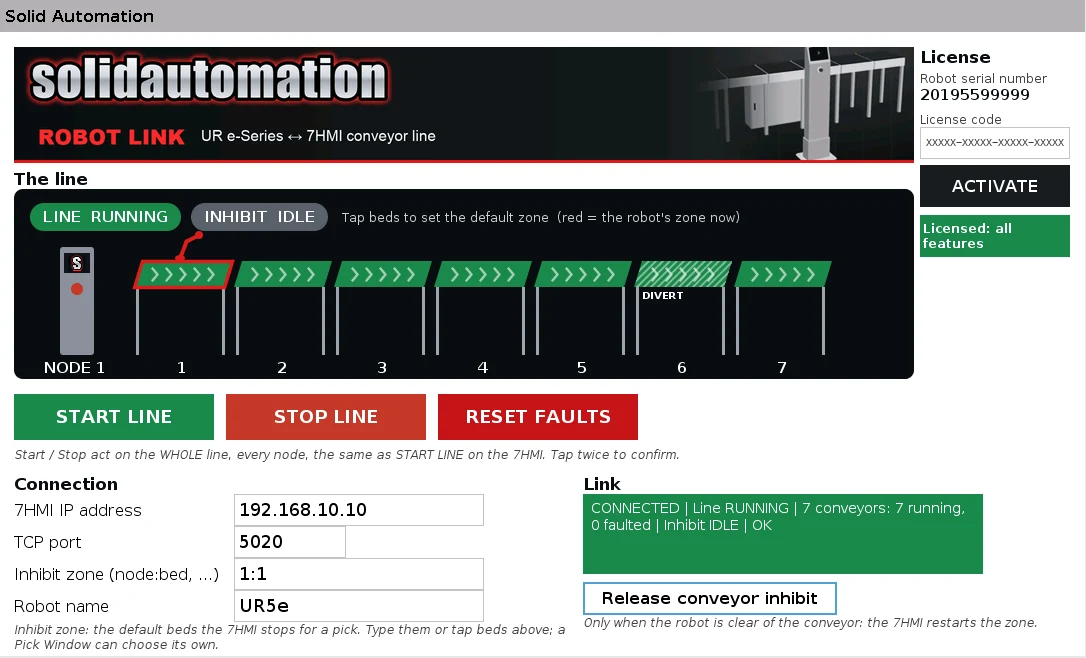 PolyScope 5 setup: live line diagram, START LINE / STOP LINE / RESET FAULTS, 7HMI…
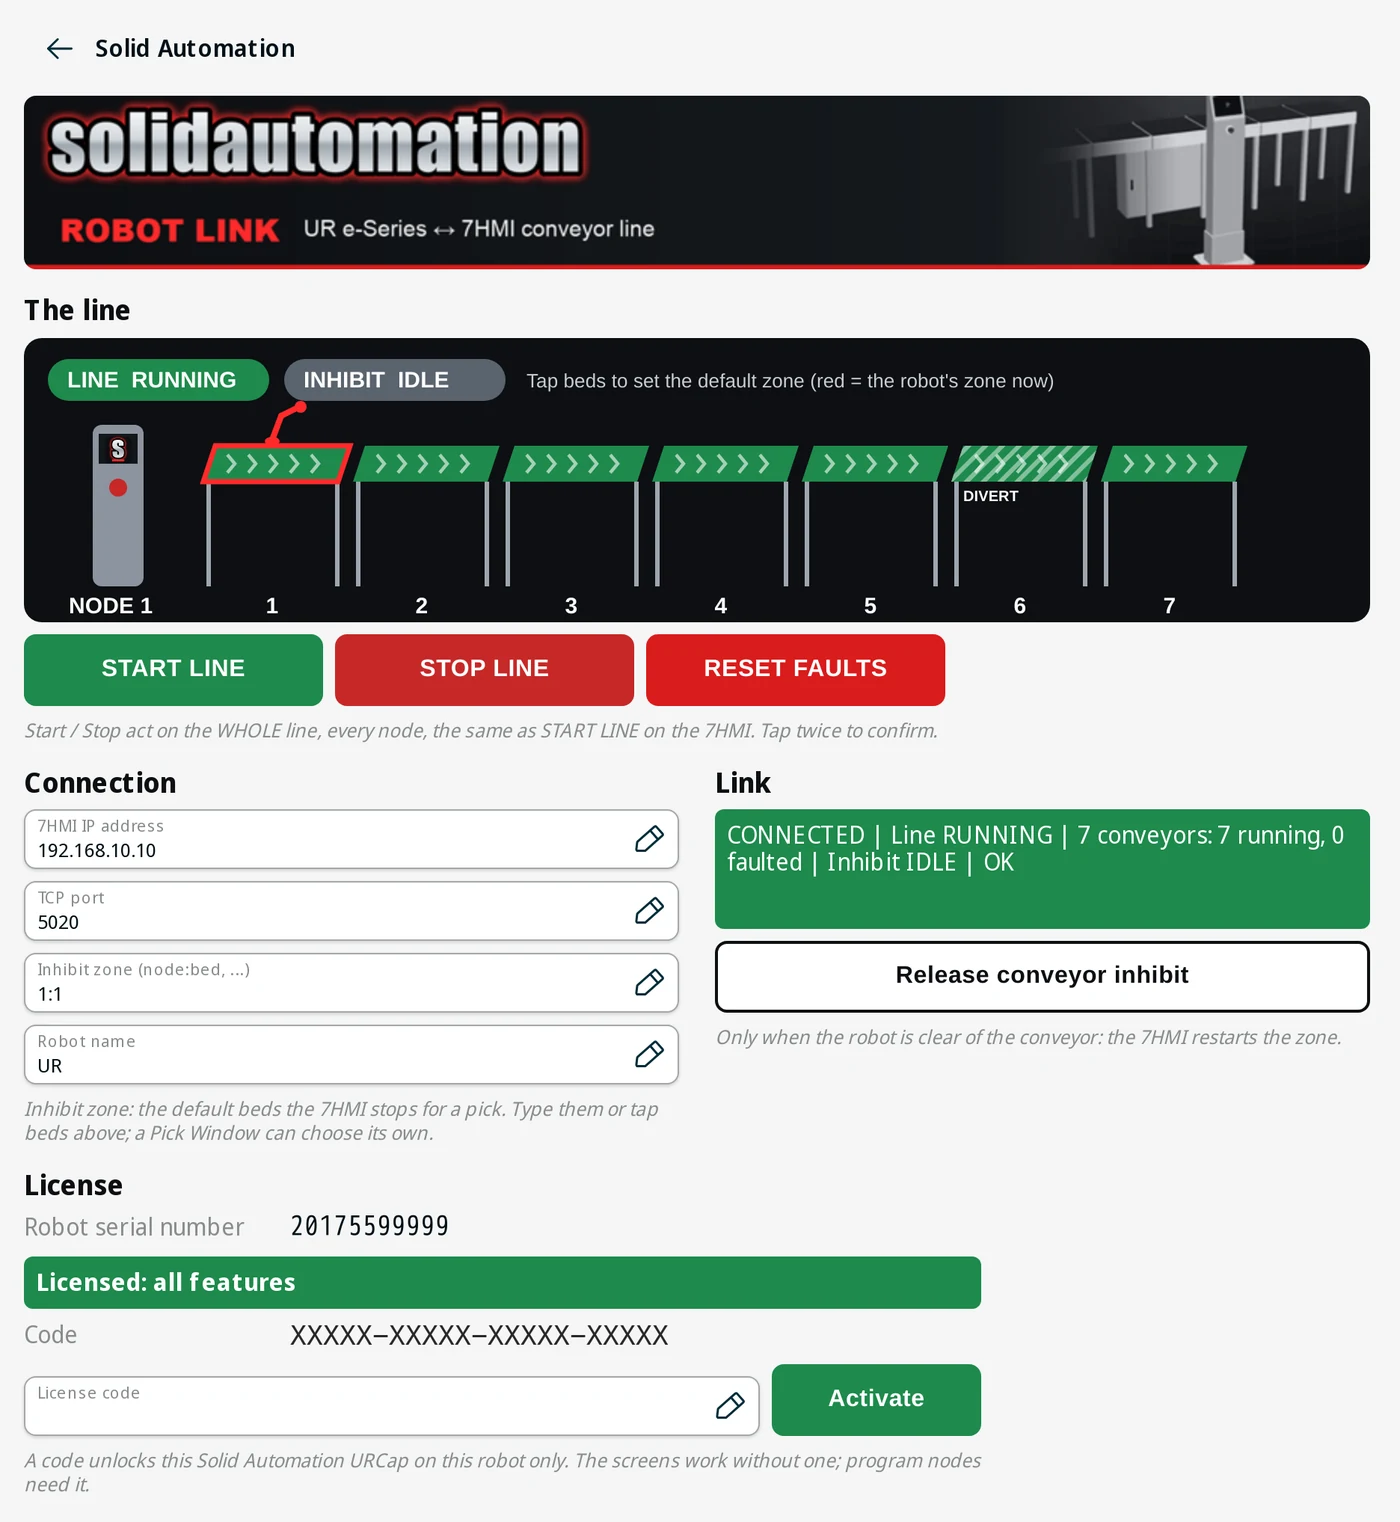 PolyScope X application: the same live line, connection and licence.
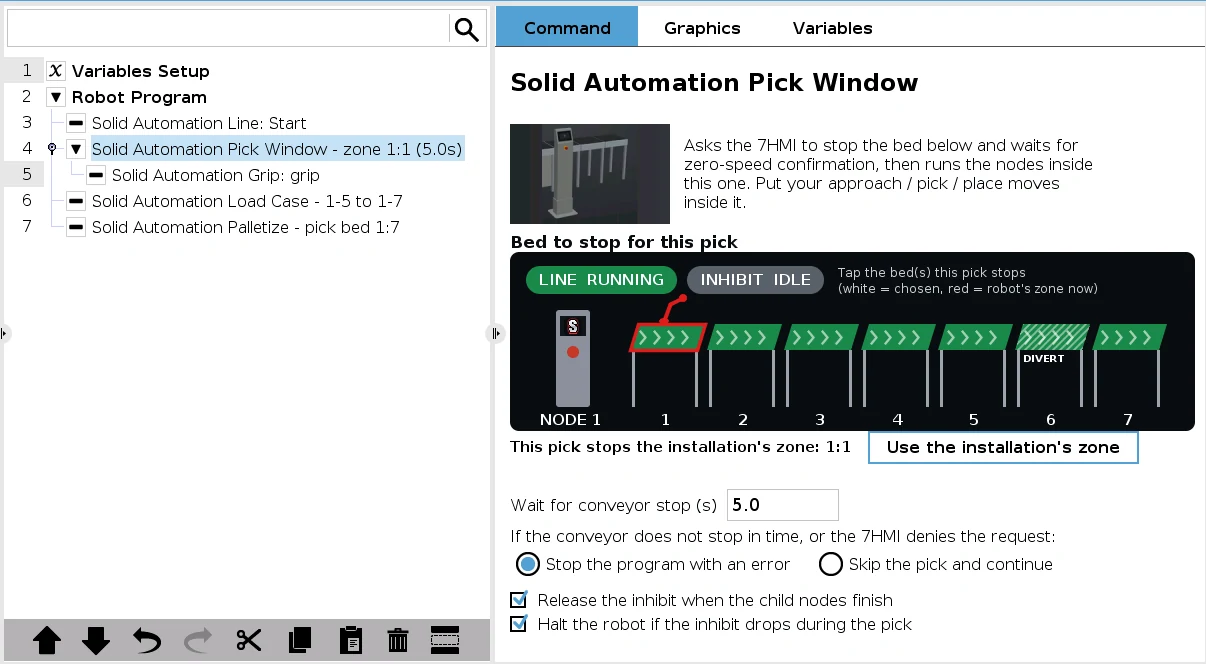 Pick Window node on PolyScope 5: choose the bed this pick stops, the stop timeout and…
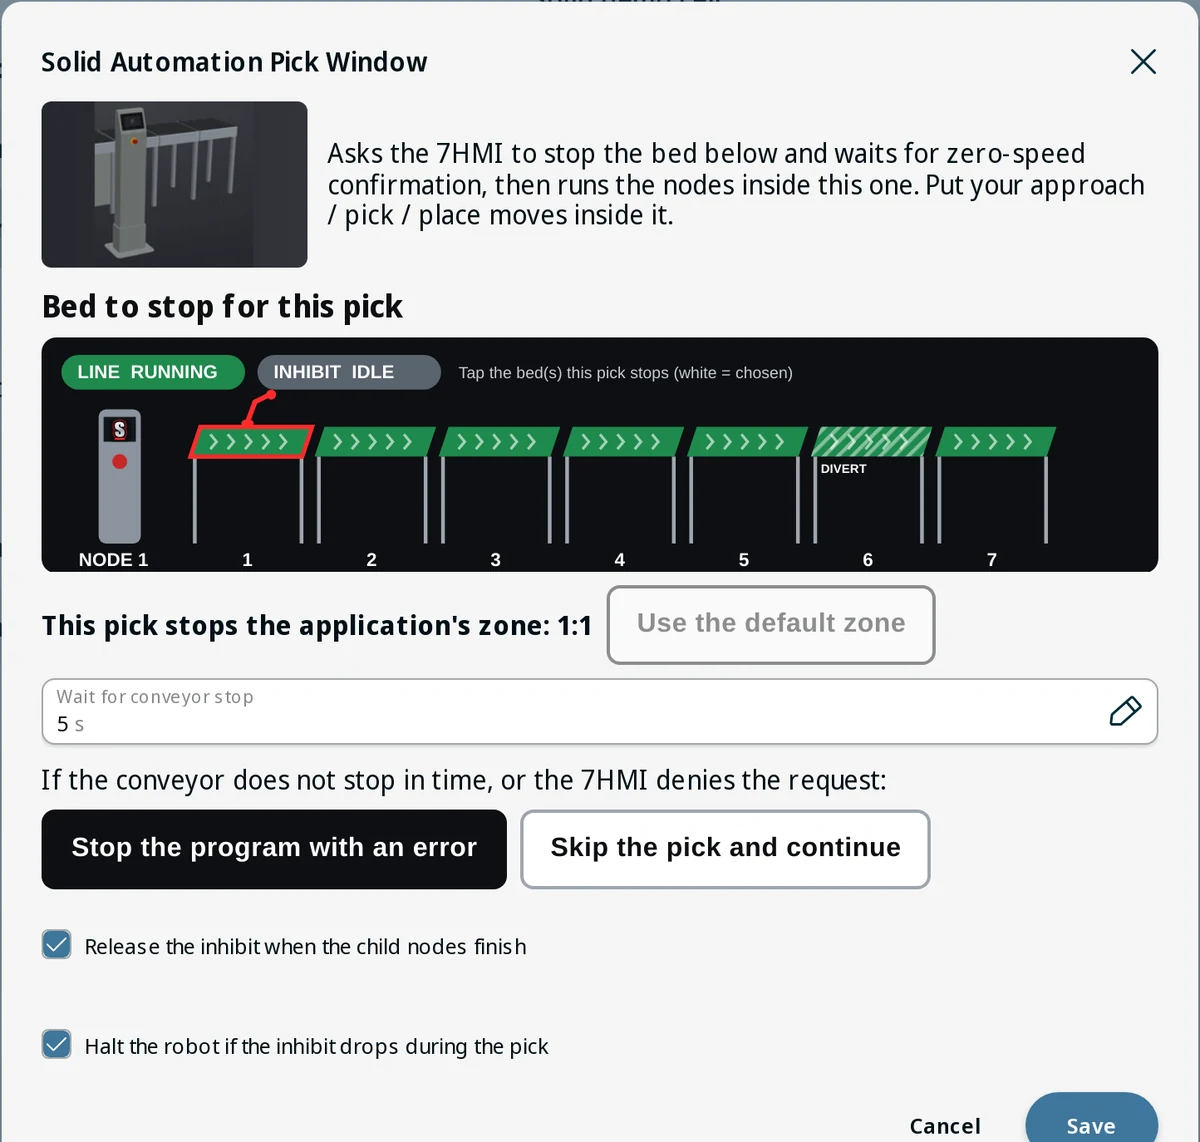 Pick Window settings dialog on PolyScope X.
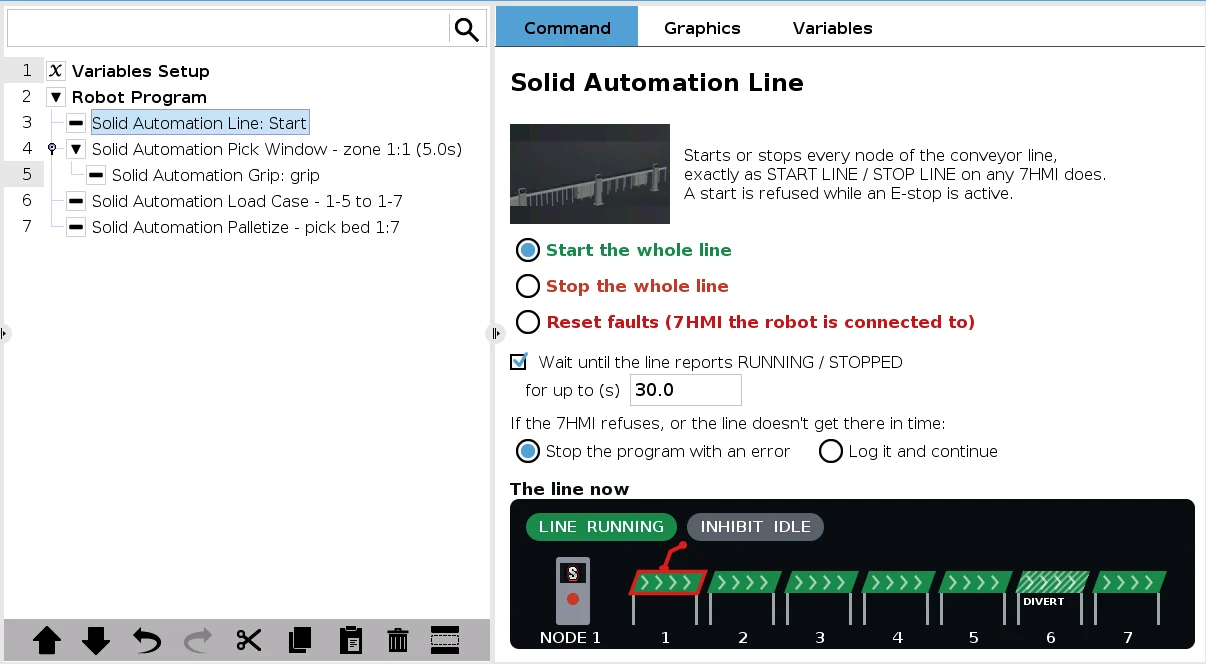 Line node: start, stop or reset the whole line from a program, and wait for RUNNING…
 Line node inline in the PolyScope X program tree.
Two-station palletizing from your conveyor.
Set the pallet and carton, pick a pattern, teach two points per pallet, run.
Layer-by-layer interlock build (every second layer turned 180°), two stations, and the scanner field following the pallet being built. Time-lapse. Illustration, not to scale. Open full screen
What it does
Each pass of the Palletize node handles one carton (put it in a Loop): the robot stops the pick conveyor through Robot Link, picks the carton with vacuum and checks the vacuum, then places it in the next place of the pallet being built. It works on two pallet stations, so one pallet can be swapped while the robot builds on the other.
Key features
- Pallet & carton: pallet length, width, deck height, highest stack and overhang; carton size and weight, plus the gripper's weight. The payload of every move is gripper plus carton, and the screen reminds you to check it against the robot (UR10e 10 kg, UR20 20 kg).
- Layer patterns: Interlock (a lengthwise and a crosswise block, every second layer turned 180° so the joints don't line up; the most stable), Column (every carton the same way) or Rotated (alternate layers turned 90°).
- Live layer preview: odd and even layers drawn with the placing order; cartons per pallet, stack height and pallet weight worked out for you (e.g. 10 per layer × 5 = 50 cartons, 1394 mm, 400 kg).
- Pattern settings: layers, gap between cartons, slip sheets (under the first layer, every N layers, or both), approach height, slide-in offset and travel speed.
- Teach in minutes: each pallet needs only two points, its corner and one point along the near edge. Tap the pick bed on the live line diagram and teach the pick.
- Station control: each station has a pallet-present sensor, a READY button and a READY lamp. The robot builds only on a pallet marked READY; a full pallet flashes its lamp. Set count resumes a part-built pallet, Empty starts again from carton 1, and counts are kept through a restart.
- Area-scanner field switching: two outputs select the scanner's field set, which follows the pallet being built. The scanner's safety outputs go to the UR's safety inputs: warning field = Reduced Mode, protective field = Safeguard Stop.
- Standard I/O (defaults on the I/O tab): inputs pallet 1/2 present, pallet 1/2 READY button, vacuum OK; outputs pallet 1/2 READY lamp, scanner field set 1/2, vacuum on.
Screens
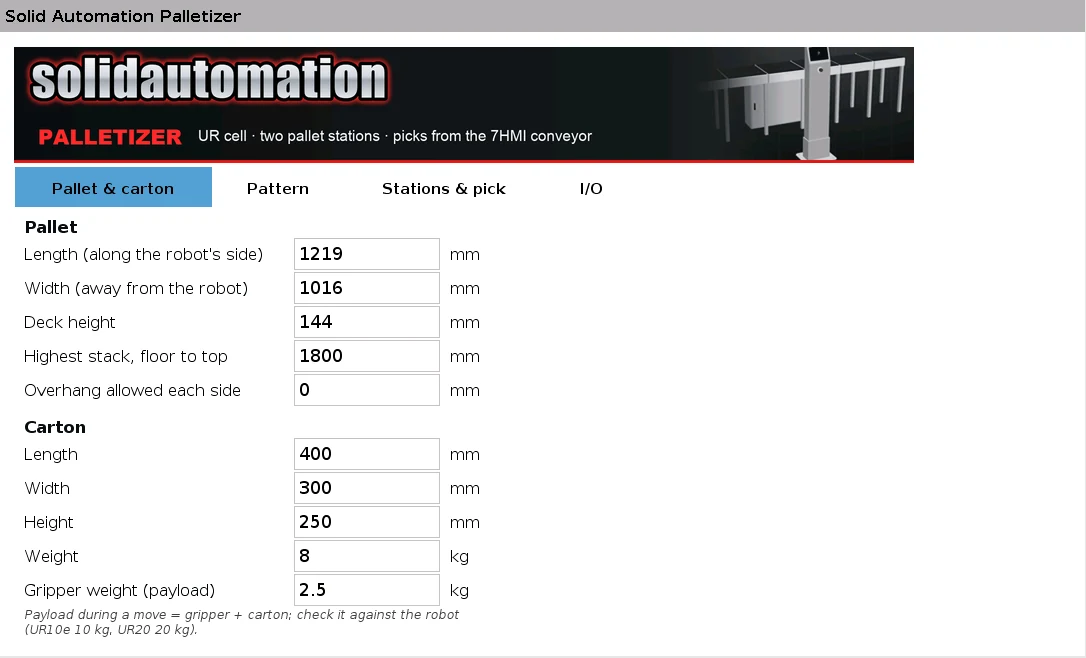 Pallet & carton tab: pallet size, highest stack, carton size and weight, gripper weight.
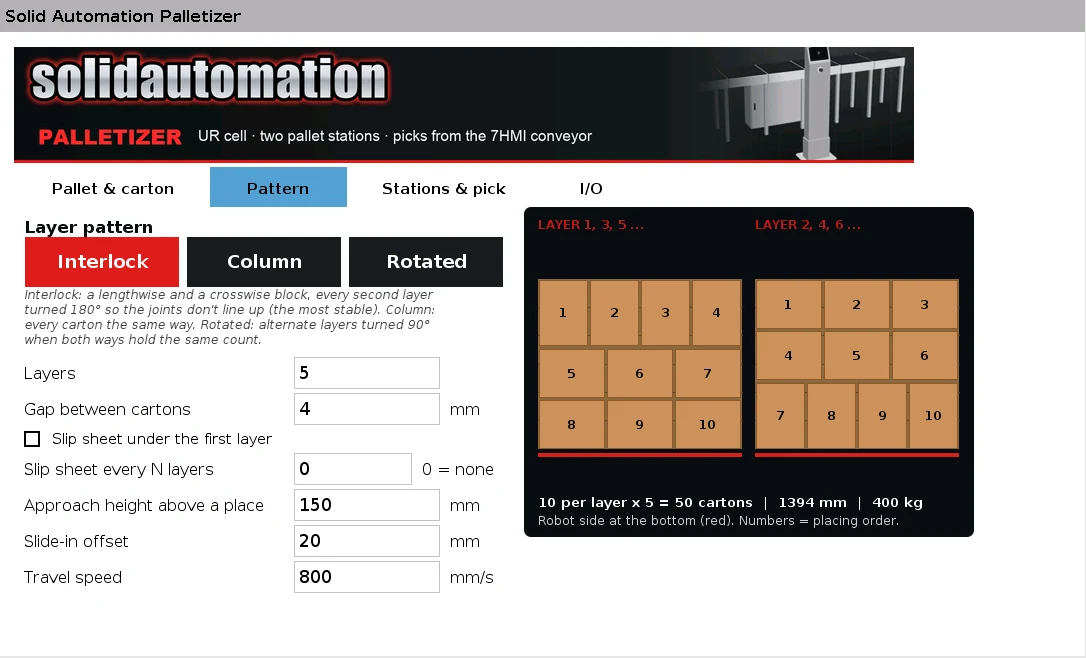 Pattern tab: interlock, column or rotated layers with a live layer preview and the…
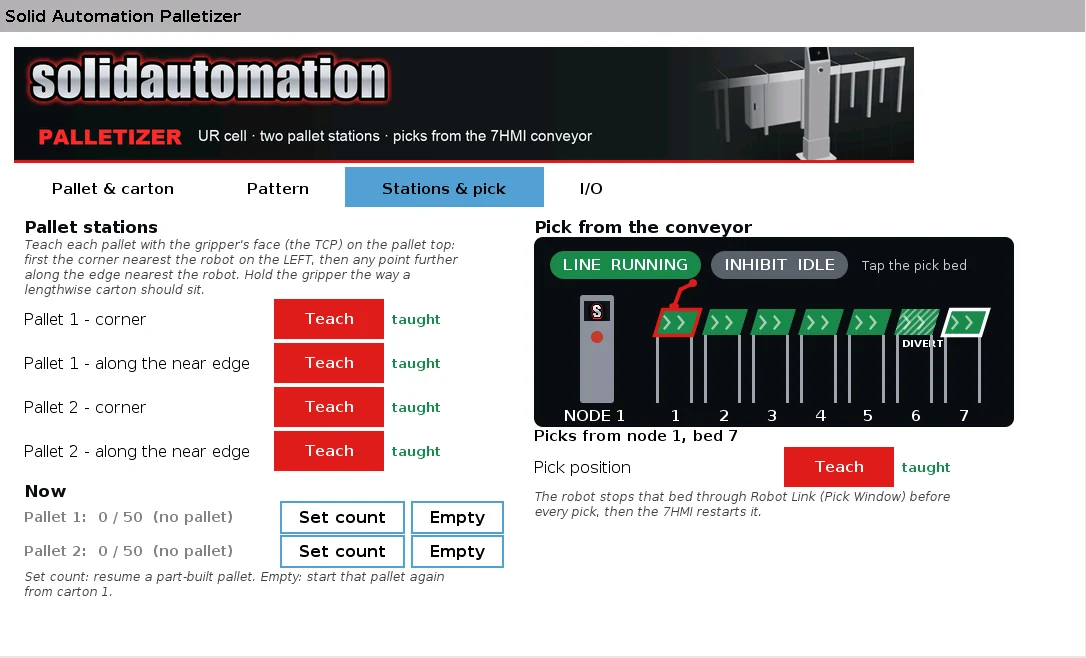 Stations & pick tab: two points per pallet, tap the pick bed on the live line.
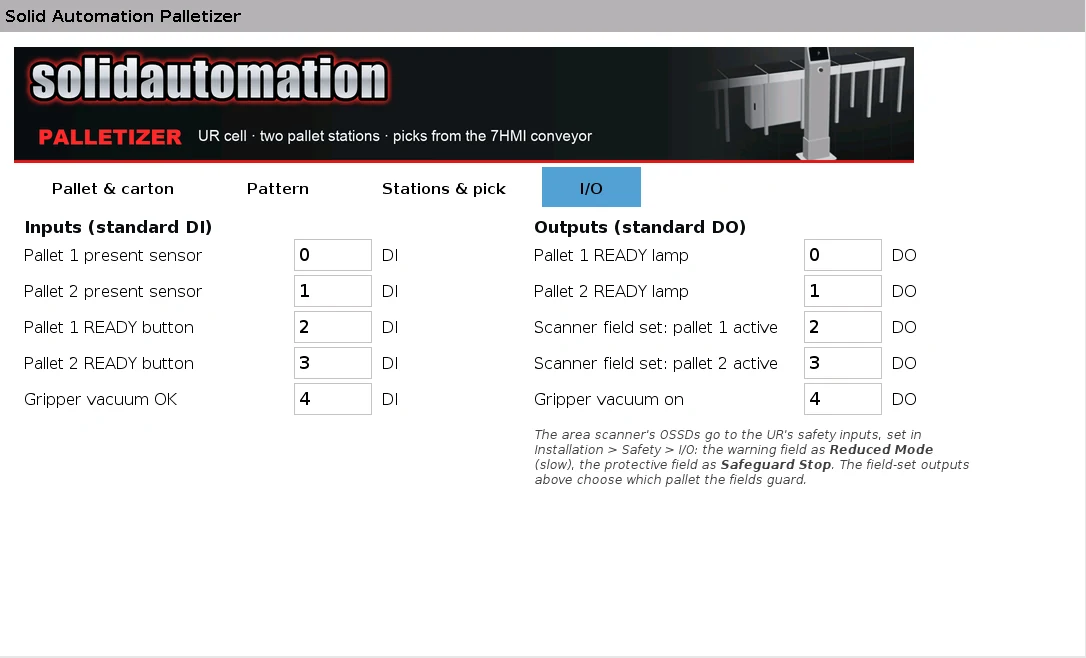 I/O tab: pallet-present sensors, READY buttons and lamps, scanner field sets, vacuum.
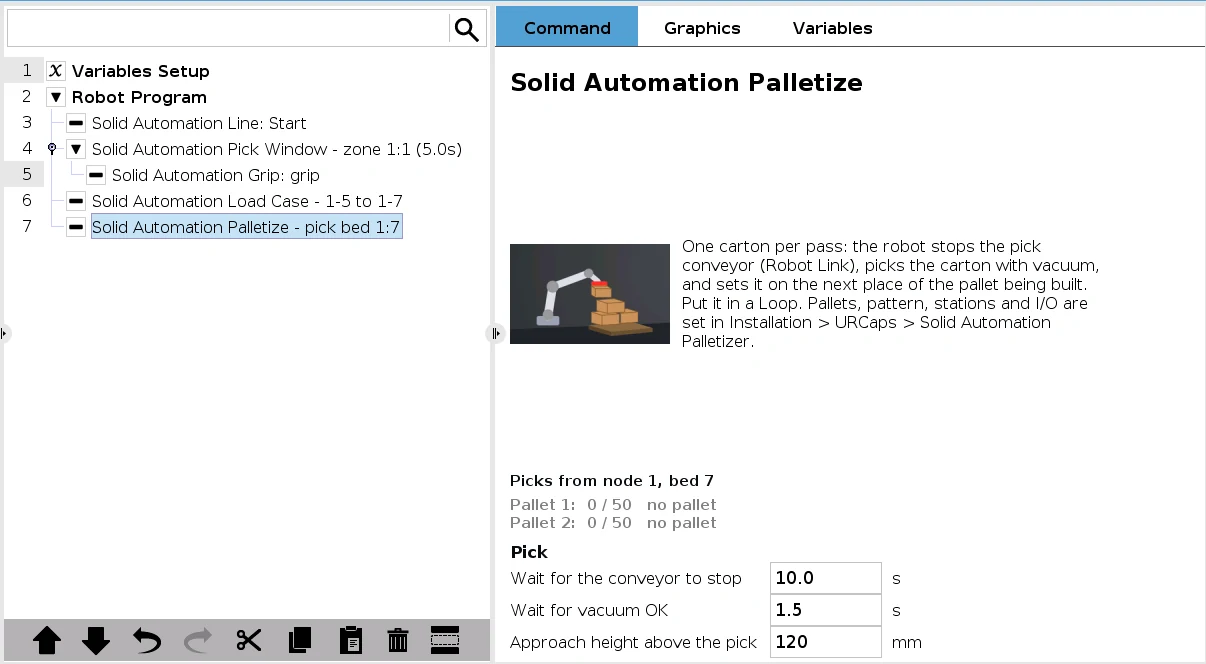 Palletize program node on PolyScope 5.
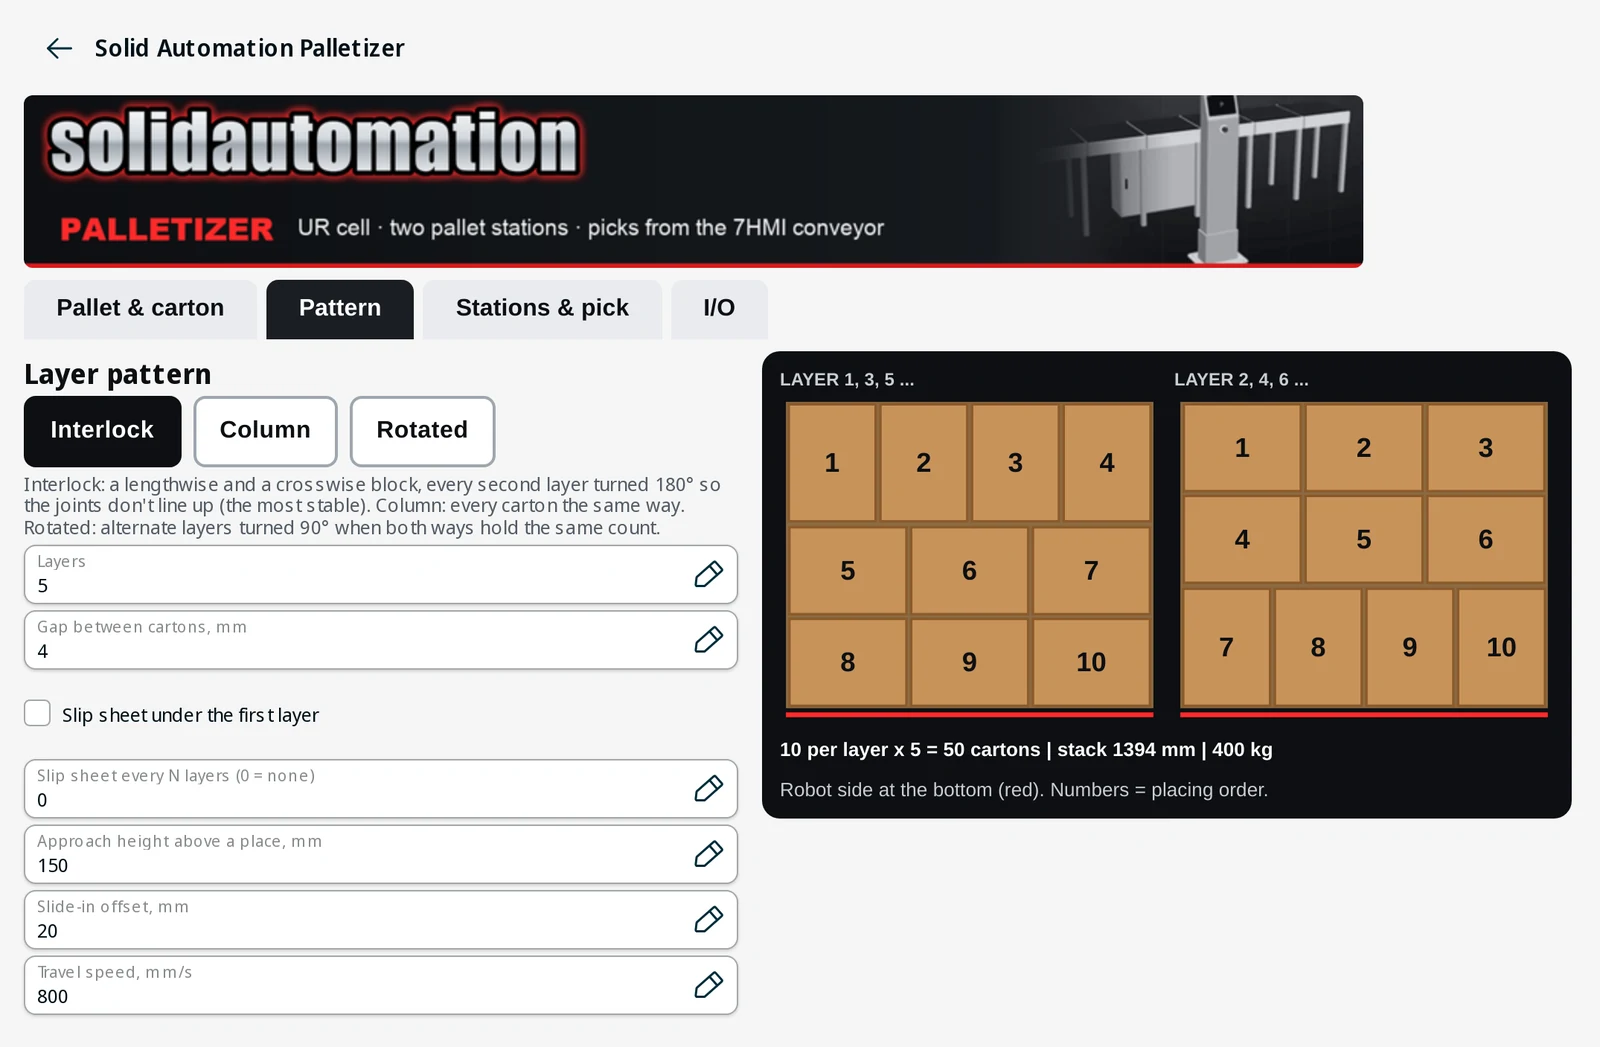 Pattern tab on PolyScope X.
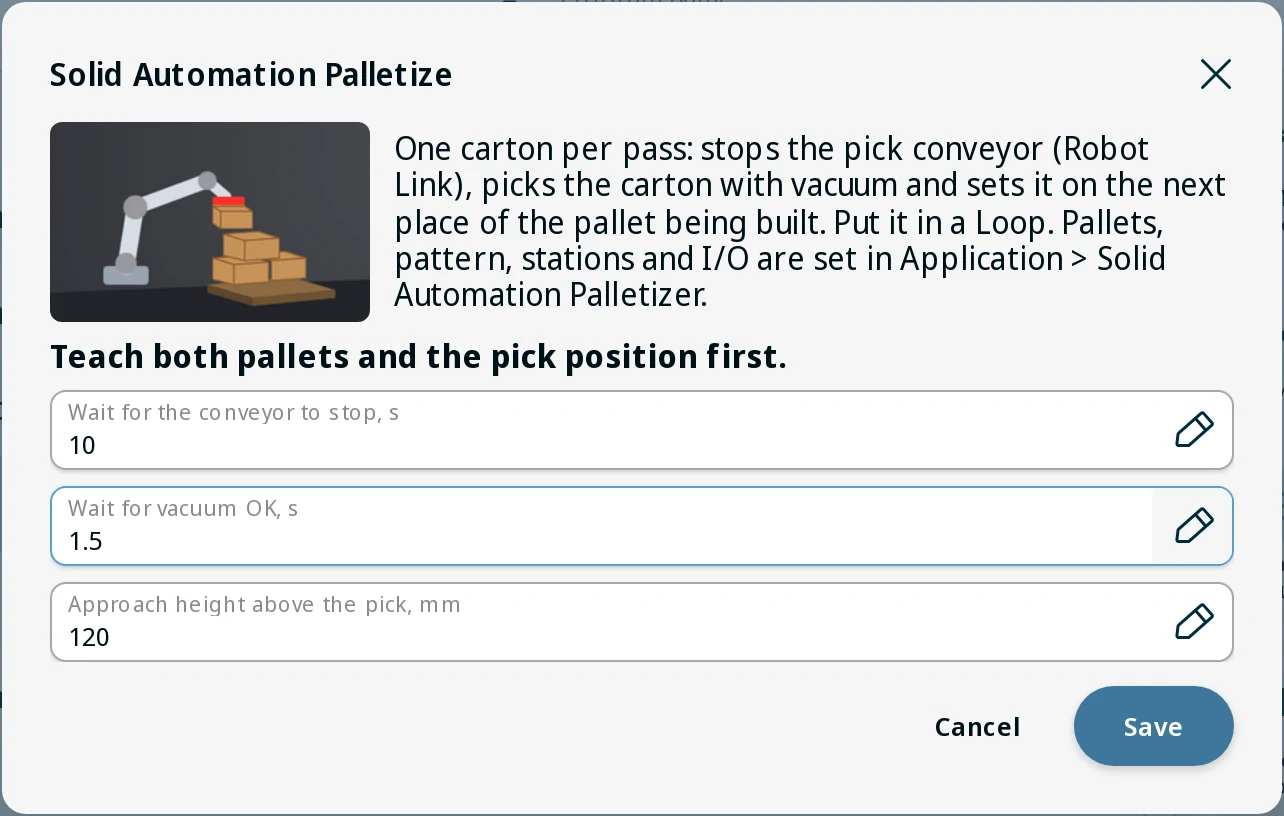 Palletize node settings on PolyScope X.
Pack products from the line straight into cases.
The case is caught, filled and sent on automatically.
Catch-and-hold at the photo-eye, the grid filling in order, the full case going on and the next one caught. Illustration, not to scale. Open full screen
What it does
Each pass of the Load Case node handles one product (put it in a Loop): the robot waits for a product at the pick bed's photo-eye and stops that bed, grips the product, and sets it in the next place in the case the panel is holding on the case bed. A full case is sent on and the next one caught.
Key features
- Case & product: case inside size and clearance to each wall, product size and weight, and a live top view of one layer with the placing order, per-layer and per-case counts and product weight.
- Packing pattern: Best fit turns the products whichever way holds more; Lengthwise or Crosswise fix the direction. Number of layers (or "as many as fit"), gap between products and divider (partition) thickness; approach height, release height and travel speed.
- Two beds, one line: pick the product bed and the case bed by tapping them on the live line diagram.
- Case catch: the panel stops the case the instant it blocks the case bed's photo-eye and holds it until it is full. The release is protected, so a restart never makes the robot refill a full case.
- Teach three points: the case corner, one point along the near wall, and the pick position (product top).
- Case control: Set count resumes a part-filled case, Empty fills it again from product 1, and Send case on lets the case go as it is.
- Gripper: vacuum (cups on the product's top) or 2-finger (closes across the product's width; products are spaced to leave room for the fingers). Grip confirm: if the grip isn't confirmed in time, the robot stops with a message instead of carrying nothing to the case.
Screens
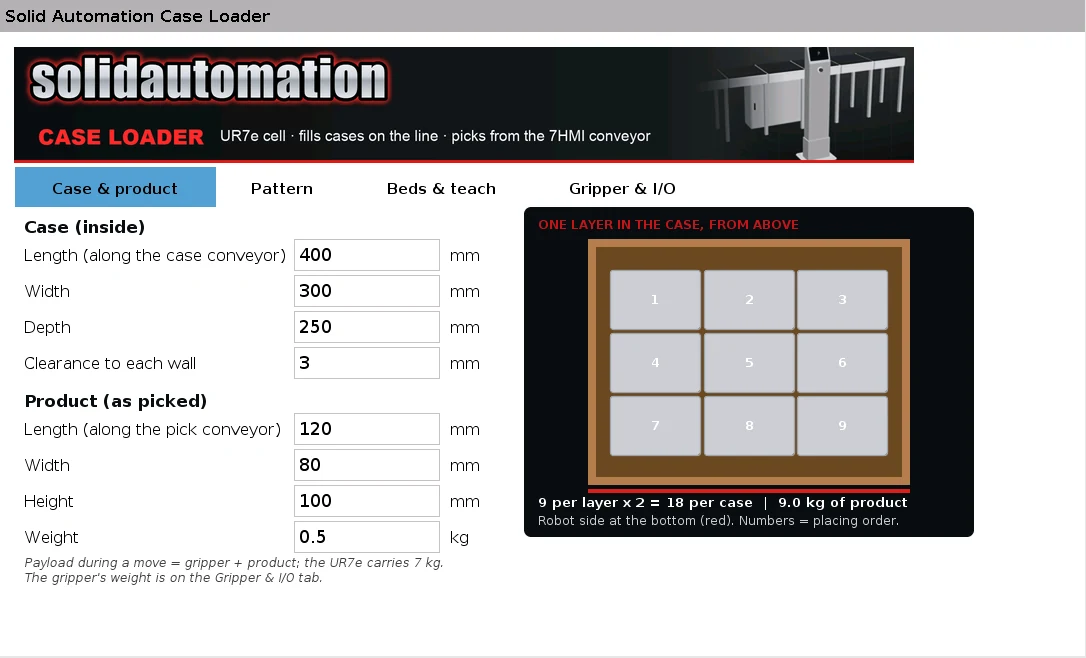 Case & product tab with a live top view of one layer and the placing order.
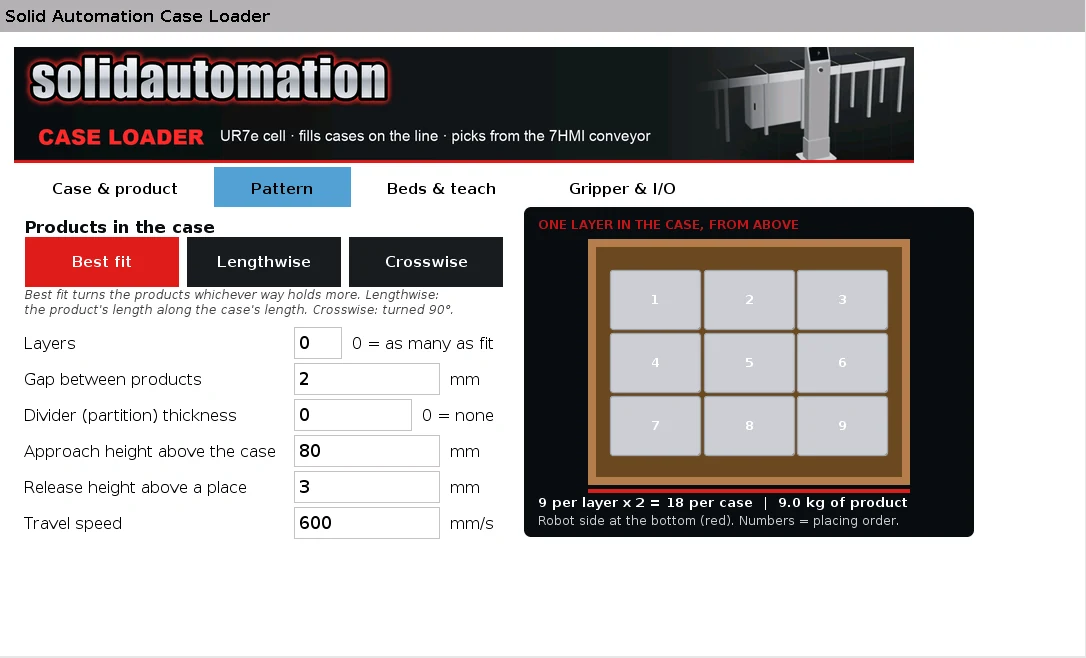 Pattern tab: best fit, lengthwise or crosswise; layers, gaps, dividers, motion.
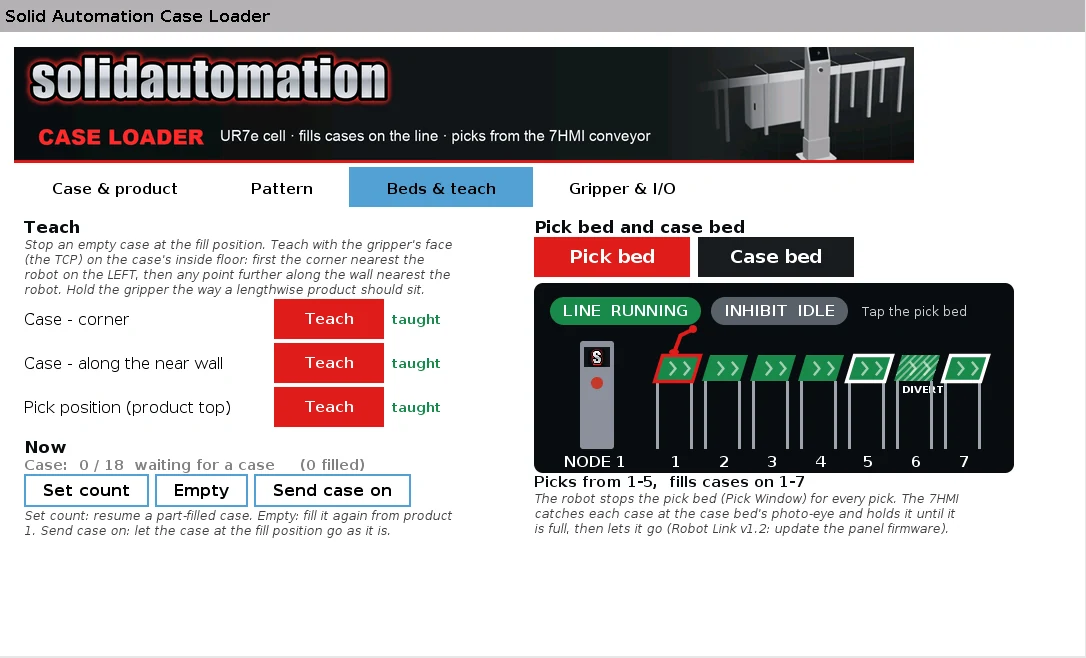 Beds & teach tab: three taught points; pick bed and case bed tapped on the live line.
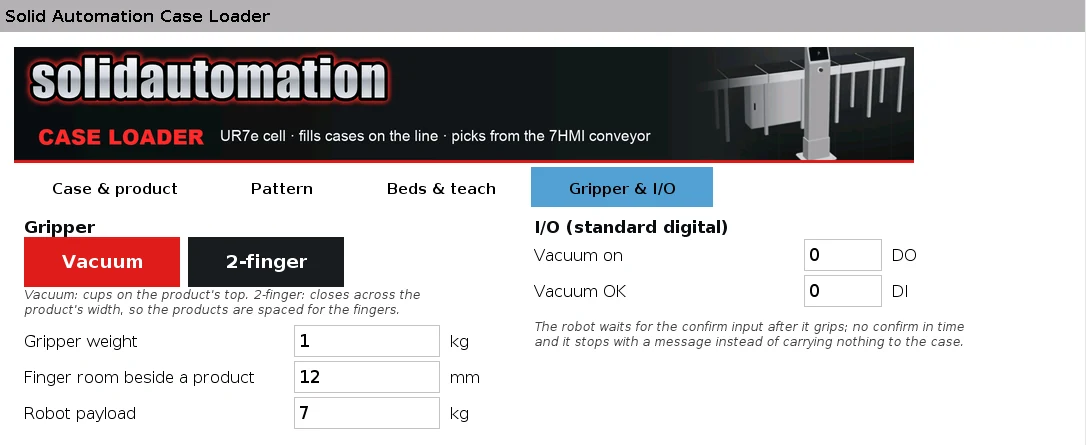 Gripper & I/O tab: vacuum or 2-finger, with grip confirm.
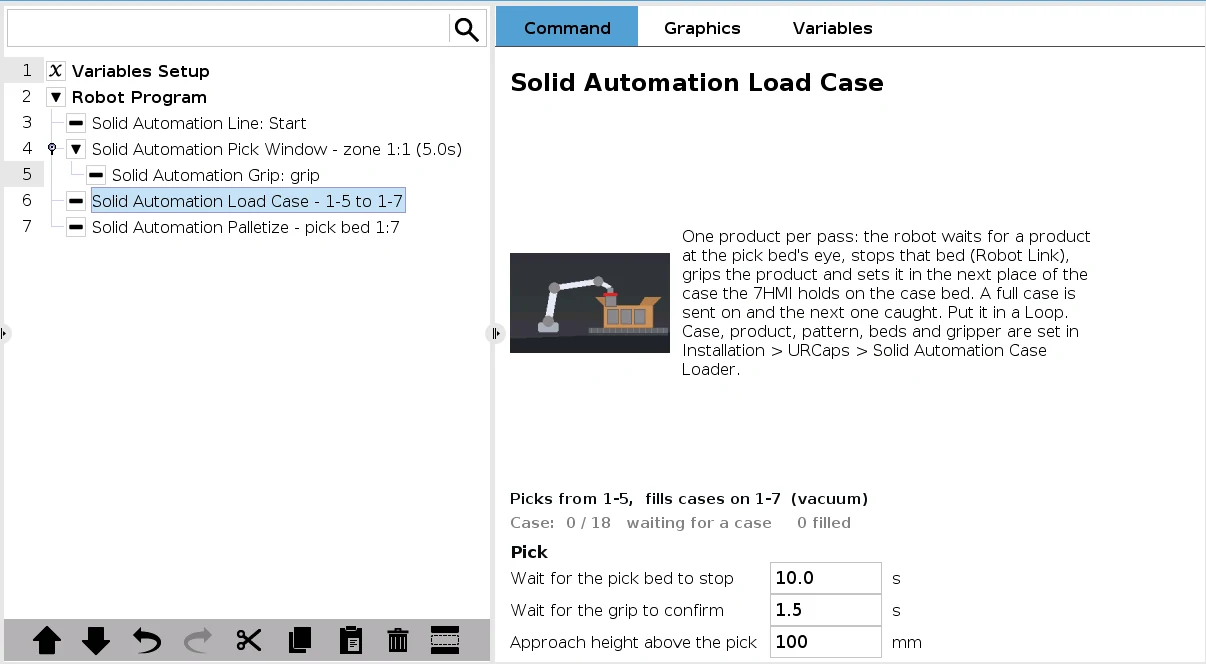 Load Case program node on PolyScope 5.
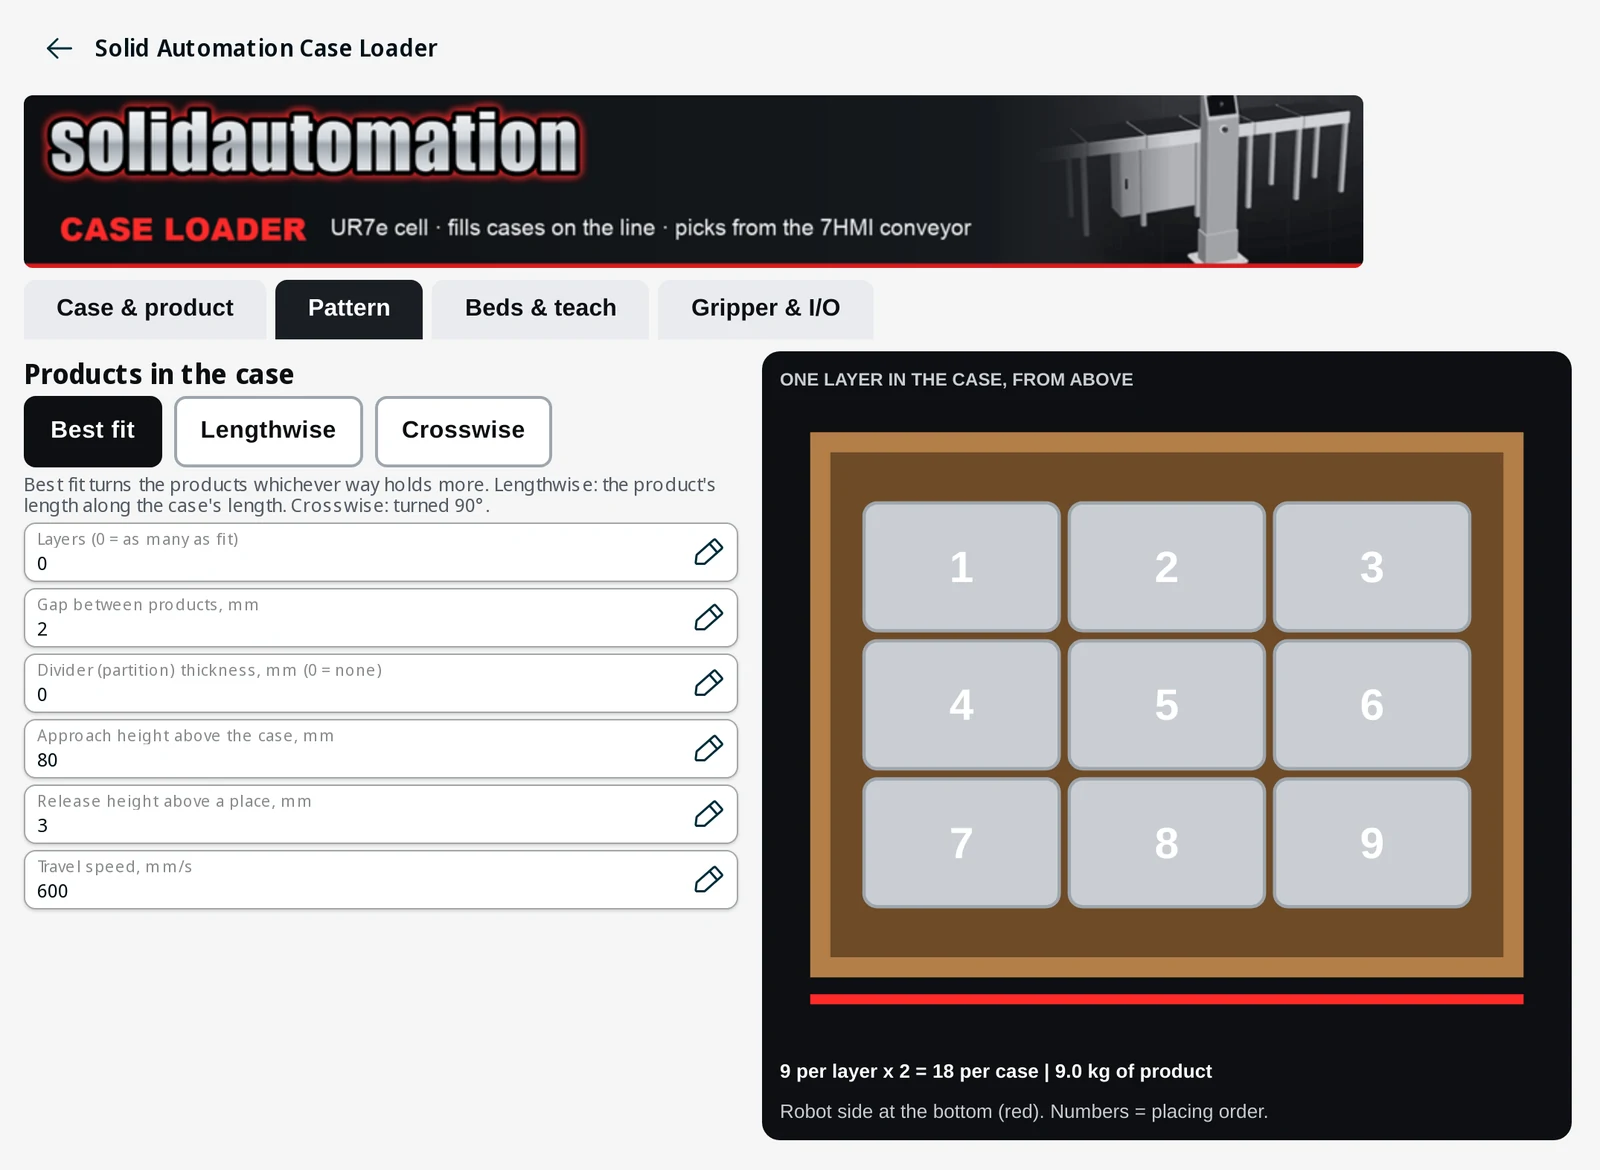 Pattern tab on PolyScope X.
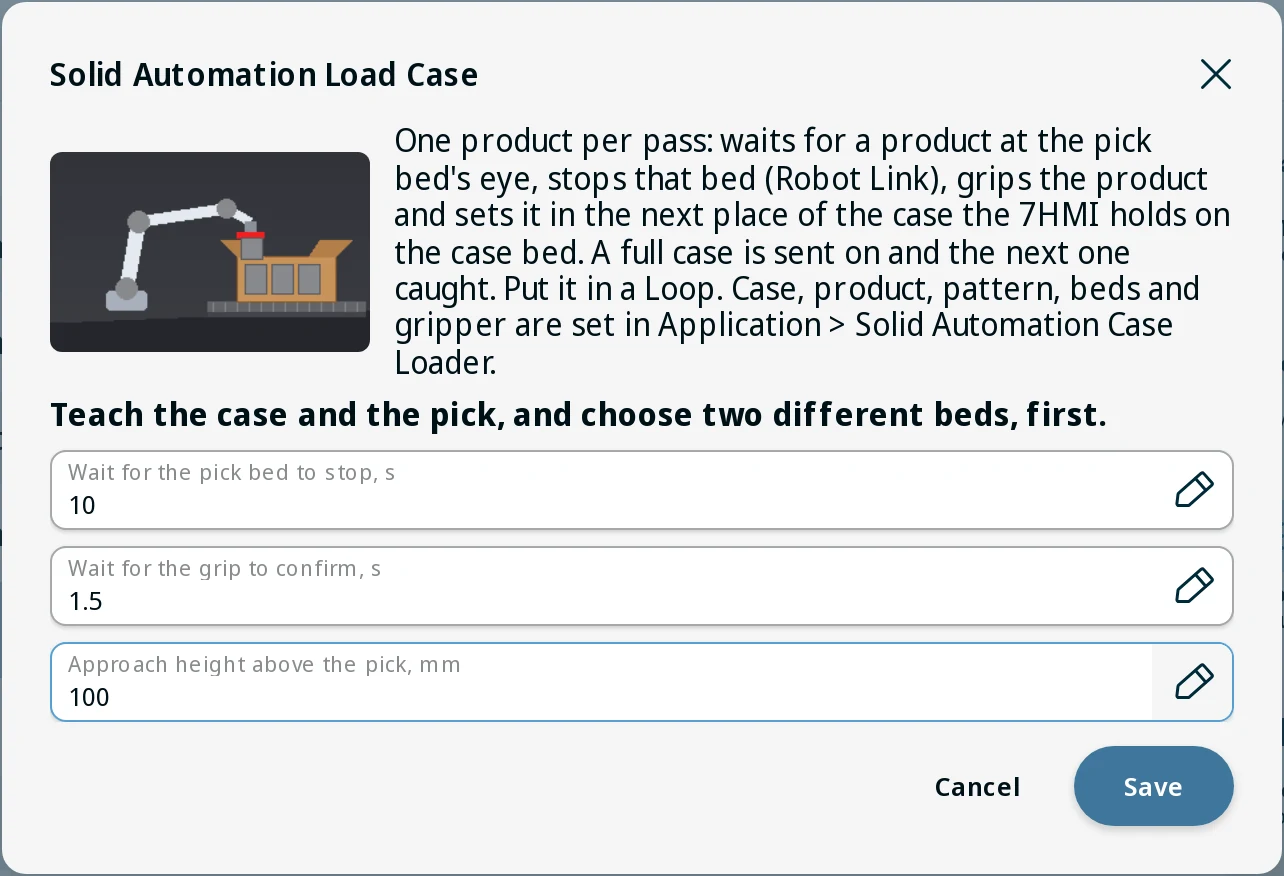 Load Case node settings on PolyScope X.
Choose the gripper once. Every node uses it.
Choose the gripper on the wrist once; every Solid Automation node that picks uses it.
The finger-width readout: a grip counts as held only when the fingers stop on the part. Illustration, not to scale. Open full screen
What it does
Gives every picking node (Palletize, Load Case and the Grip node) one shared gripper setting. The URCap drives the gripper itself; the gripper maker's URCap is not needed.
Three gripper types
- Standard I/O: the Palletizer and Case Loader switch their own control-box output and read their own input.
- Robotiq Hand-E support: driven by Solid Automation's own driver on the wrist RS485 port (24 V, 115200 baud). Set the open width (before a pick), grip width, speed and force; widths run from 0 (closed) to 50 mm (open). A grip counts as held only when the fingers stopped on the part. The Hand-E activates once at program start.
- Schmalz ECBPMi support (vacuum generator) on wrist digital I/O in its standard (SIO) mode: suction and blow-off are wrist outputs (24 V, PNP), part-present is a wrist input. Blow-off time after a release is adjustable; blow-off wins if both outputs are on.
Key features
- Test buttons on the setup screen. Hand-E: ACTIVATE / OPEN / CLOSE / STATUS. ECBPMi: SUCTION ON / SUCTION OFF / BLOW-OFF / STATUS.
- Grip node: GRIP, RELEASE or OPEN. It waits up to a set time for the grip; if the part isn't gripped, it stops the program with an error or goes on (the program can test
cv_gripped_now). - Script functions: grip, release, open, gripped.
Screens
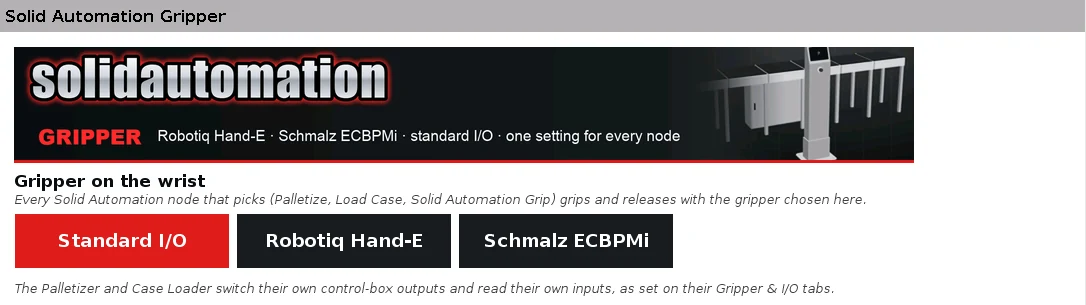 Standard I/O: the Palletizer and Case Loader switch their own outputs and read their…
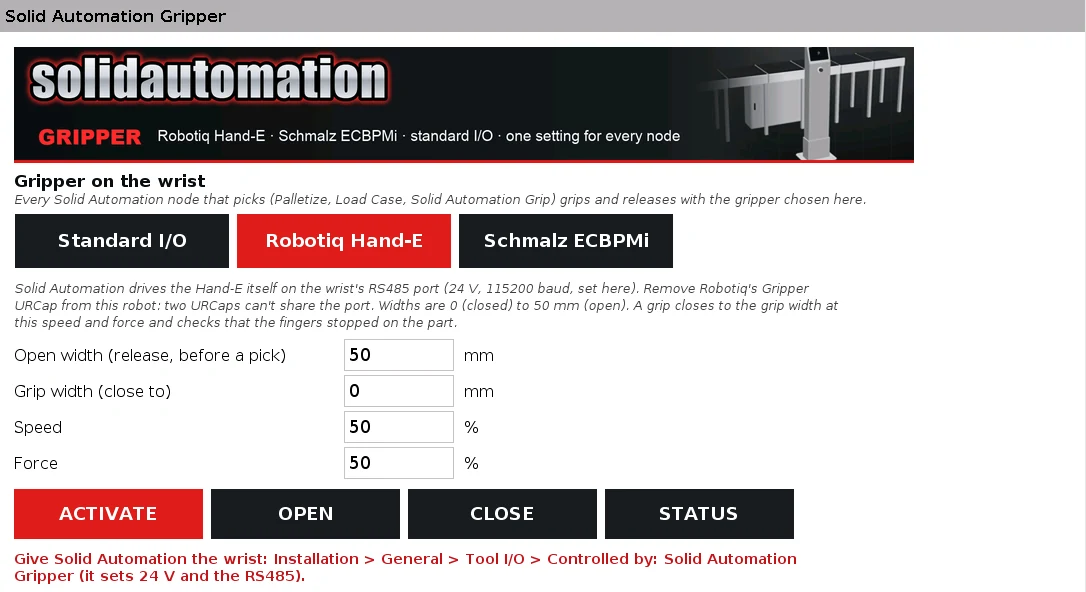 Robotiq Hand-E: open width, grip width, speed and force, with test buttons.
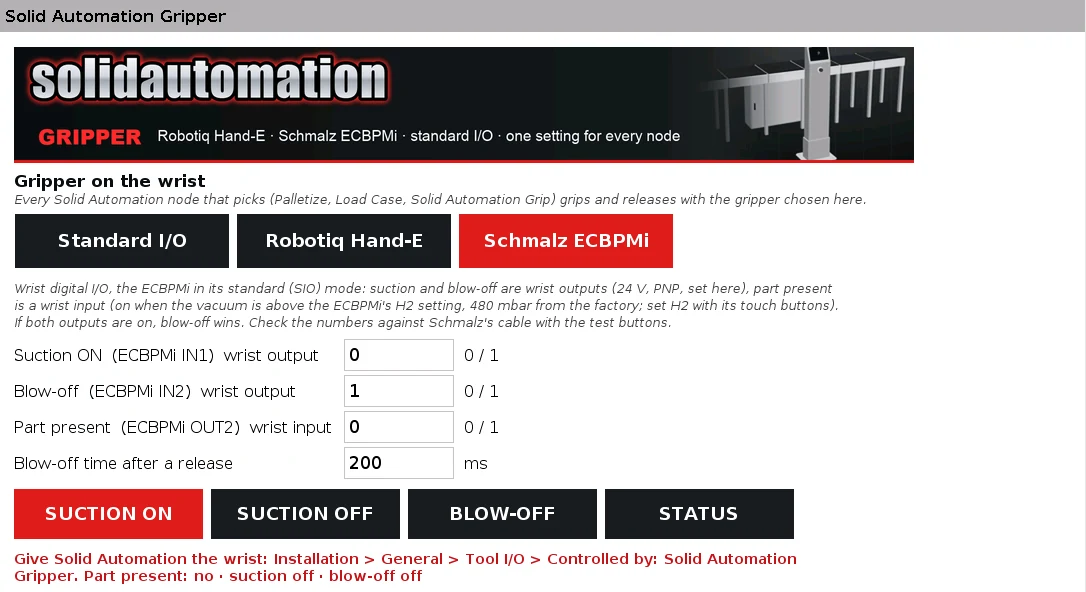 Schmalz ECBPMi on wrist digital I/O: suction, blow-off, part present, blow-off time.
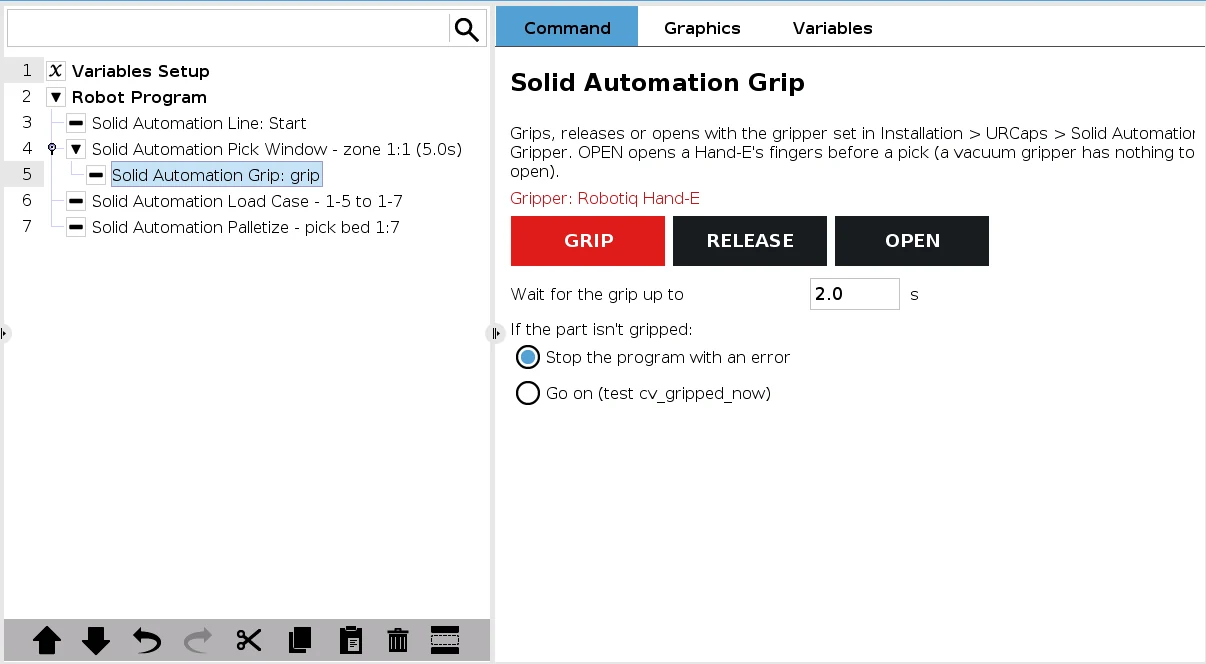 Grip program node: GRIP, RELEASE or OPEN, with a timeout and what to do if the part…
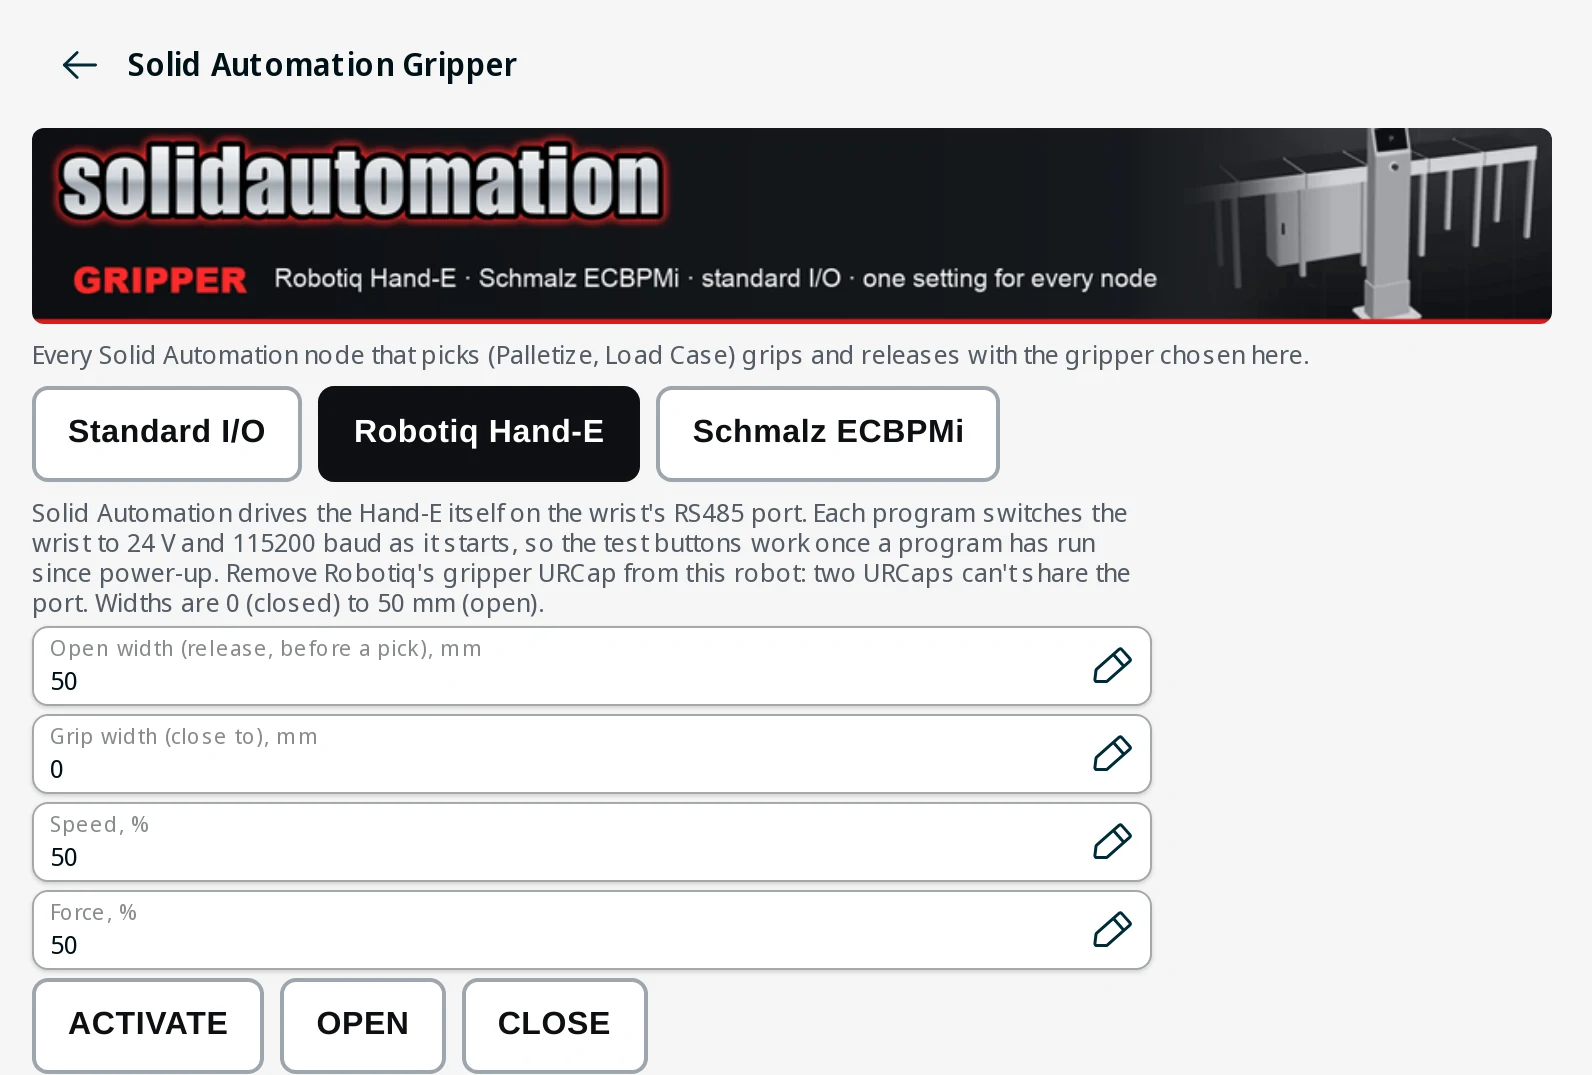 Gripper application on PolyScope X, Hand-E selected.
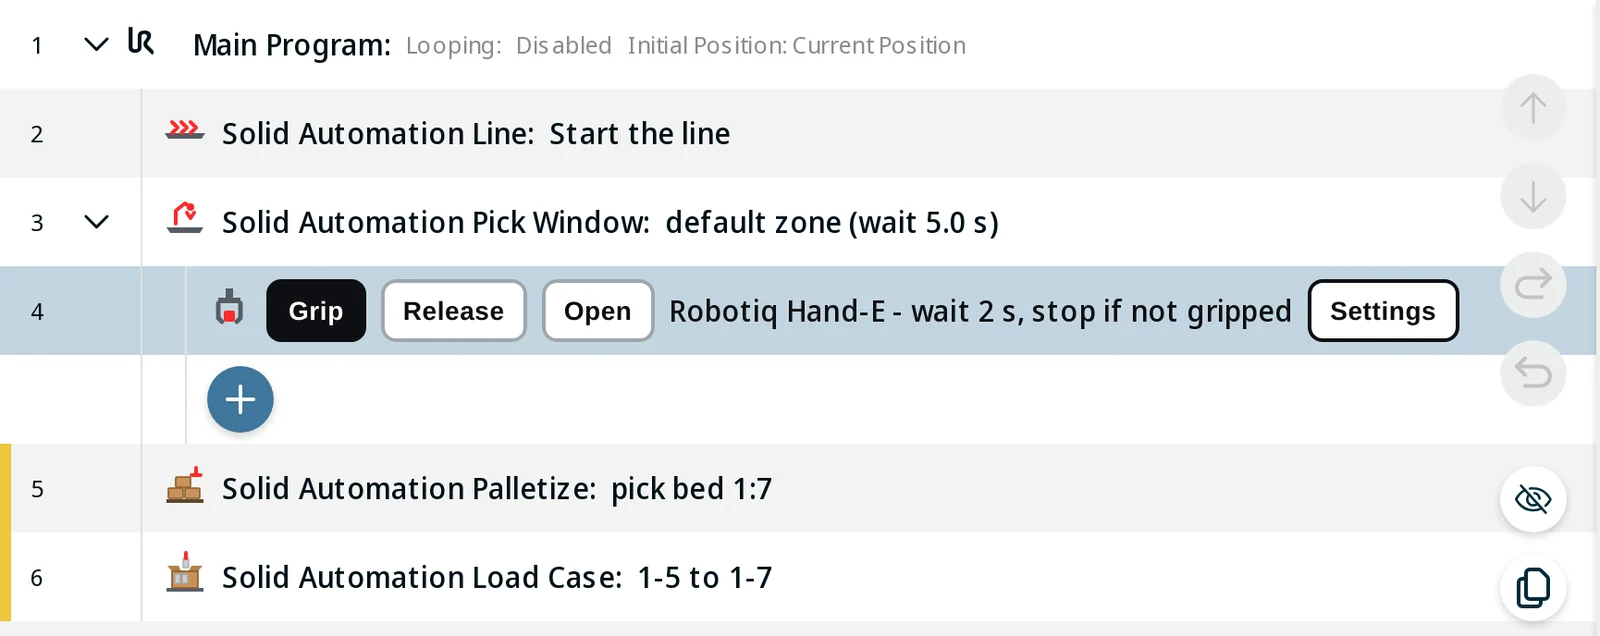 Grip node inline in the PolyScope X program tree.
Vision: coming soon.
Vision-guided picking, inspection and measuring with a Solid Automation camera.
Coming soon. Ask us to be told when it is ready.
Licensed per robot.
Licensed per robot, locked to its serial number, code issued on purchase.
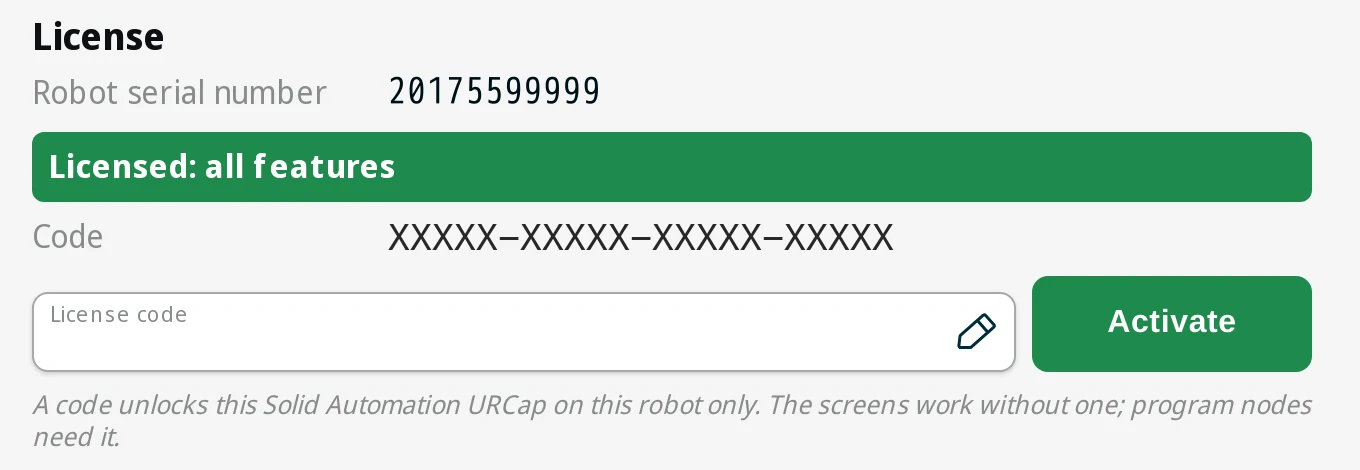
- One code per robot. The URCaps are locked to the robot's serial number; a licence code unlocks them on that one robot.
- Issued on purchase. Send the robot's serial number (shown on the licence panel) and you get a 20-character code.
- Enter it once. Type the code on the licence panel and press ACTIVATE. On PolyScope 5 it is kept robot-wide and survives new installations.
- Both PolyScope versions. The same code works for the PolyScope 5 and PolyScope X editions on that robot.
- No internet needed. The robot checks the code itself, so it can stay offline.
- Try before you buy. Without a code the setup screens still open, so you can explore them. The program nodes need the code; an unlicensed program won't start.
System requirements.
| PolyScope 5 | PolyScope X | |
|---|---|---|
| Robots | UR e-Series (e.g. UR5e/UR7e, UR10e, UR20). Not CB3. | UR robots running PolyScope X |
| Software | PolyScope 5 | PolyScope X |
| Install | Settings › System › URCaps › +, from a USB stick, then restart | URCap install in PolyScope X |
| Line | Solid Automation 7HMI / 7HMImdr panels with Robot Link firmware: protocol v1.1, or v1.2 for the Case Loader's case catch | |
| Network | Ethernet from the robot controller to the line's 7HMI panel (TCP port 5020). Wi-Fi only through a client bridge on the controller's Ethernet port. | |
| Footprint | One install covers all parts: one URCap, one background service, one link to the line. | |
Put a UR robot on your line.
Tell us about the line, the robot and the job. We'll come back with what it takes.